So you’ve collected your CaH pack from the salon, or you’ve had it delivered; what follows is a basic step-by-step guide to mixing, application and removal.
Firstly, within your CaH pack will be the following:
- The colours and developer we use in the salon on your hair
- Tint bowl
- Tint brush
- 1 pair of disposable gloves
- Disposable colour cape
- Mixing instructions (attached to the bag)
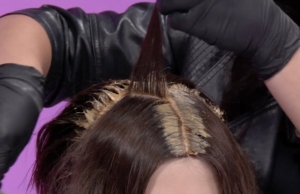
 Ideally, we would recommend getting another person from your household/bubble to apply the colour – it is very difficult (almost impossible) to apply the colour evenly yourself. Whilst you should try to apply the colour evenly to the hair, don’t worry too much if it is not 100% even, this is designed to tide you over until we see you (hopefully very soon!) – see picture of tint application – messy(ish) is ok!
Step 1: Place your empty tint bowl on a set of digital scales – set to zero.
Step 2: Measure the exact gram measurement of each tint/colourant into the bowl (don’t worry too much about going 1g over/under). Remember to reset the sales to zero after each colourant is measured into the bowl.
Step 3: If mixing 2/3 colours together, mix the colourants together before you add the developer – a plastic fork (or similar) is ideal
Step 4: With scales reset to zero, add your developer/peroxide and now thoroughly mix together.
Step 5: If you are using a light brown depth colour (or darker) we would recommend applying a little vaseline around the hairline and to the ears, as the colour will stain the skin otherwise – be careful not to apply the vaseline to any of your hair as this will act as a barrier to the colourant.
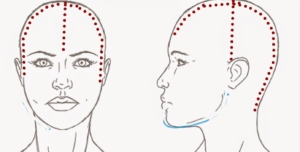
 Step 6: Using the tail end of your tint brush (or a comb) make a centre parting and apply tint to the root area either side of that parting. Make another parting from crown to the nape (almost as if you were taking the section for ‘bunches’), and apply tint either side of this parting. Create two more partings from the middle-crown to the top of each ear and apply tint in the same way (see illustration).
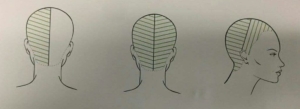
 Step 7: Now take 1cm sections diagonally through the rear sections and apply the tint each side of those ‘partings’, then do the same to the front sections (see illustration)
Step 8: After 80% of your development time has passed, Distribute remaining tint through the hair, using a wide-toothed comb to evenly distribute through mid-lengths and ends (you are only ‘refreshing’ the ends a little, so don’t worry if there is not enough colourant to coat all of the hair, but try to ensure the top/front has the highest level of coverage).
Step 9: Wet the hair thoroughly in the shower (AVOID CONTACT WITH THE EYES) and massage the colourant for approx 1 minute (using provided gloves) to emulsify the colourant and ‘move’ the product away from the scalp (almost as if you were shampooing the hair). Now rinse thoroughly and shampoo/condition as you would normally.
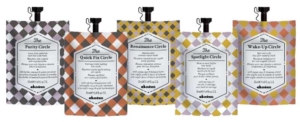
 Step 10: Style as normal and try to perform a deep-conditioning treatment within 1 week (single use Davines Circle Moments treatments are available at £9.00 each and can be delivered with your CaH pack – see pic).
We are offering this service to existing novo clients who have had a colour service at our Hockley salon within the previous 6 months – we are unable to offer the CaH pack if you have a highlights/Balayage service, or if you haven’t had a colour within 6 months (this is a legal requirement due to us needing to perform a skin sensitivity test – which we are unable to offer at present).
The CaH pack costs from £25.00 (if only one colourant is required). We try to keep the cost to a minimum and we ask that clients return any unused colour (please ensure the lids are put back on the tubes), together with the tint bowl and brush once the salon has reopened. If we have decanted the peroxide developer into a small container, any unused developer should be discarded responsibly (as it is a chemical product).
Finally, and in case we didn’t make it clear enough, AVOID CONTACT WITH THE EYES.